// Technology log
A Journey Into the Ultimate DIY Headphone & Speaker Amp
STATUS: BUILT
CATEGORY: AMPLIFIER
YEAR: 2018
THE MISSION: BALANCED CLEAN
A Journey Into the Ultimate DIY Headphone & Speaker Amp
There is a point in the DIY audio hobby where you stop looking at retail gear entirely. You realize that if you want something built without a single corporate compromise, you have to source the metal, heat up the soldering iron, and construct it yourself.
For me, it was the AMB Beta22.
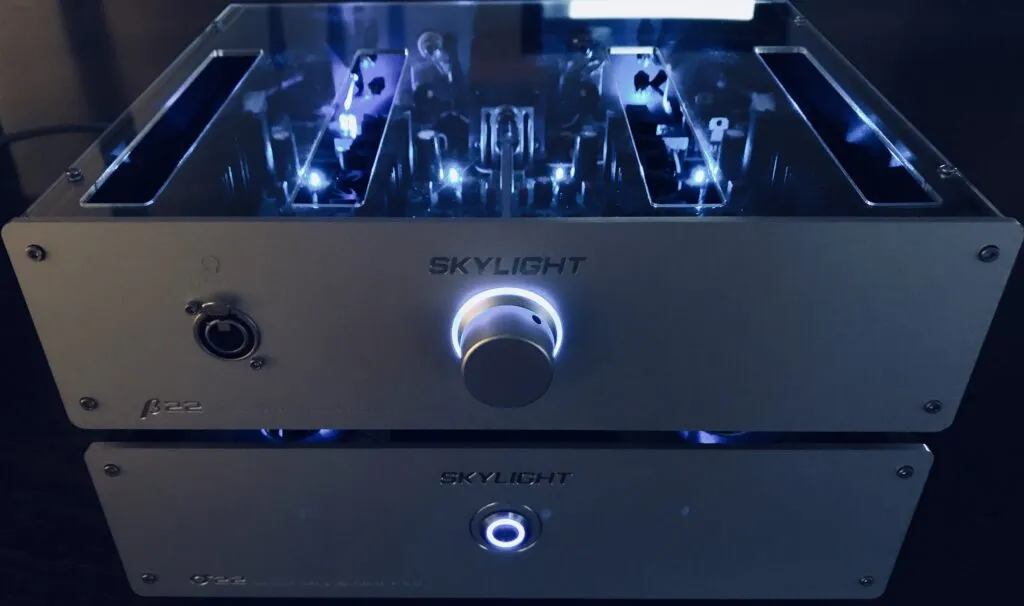
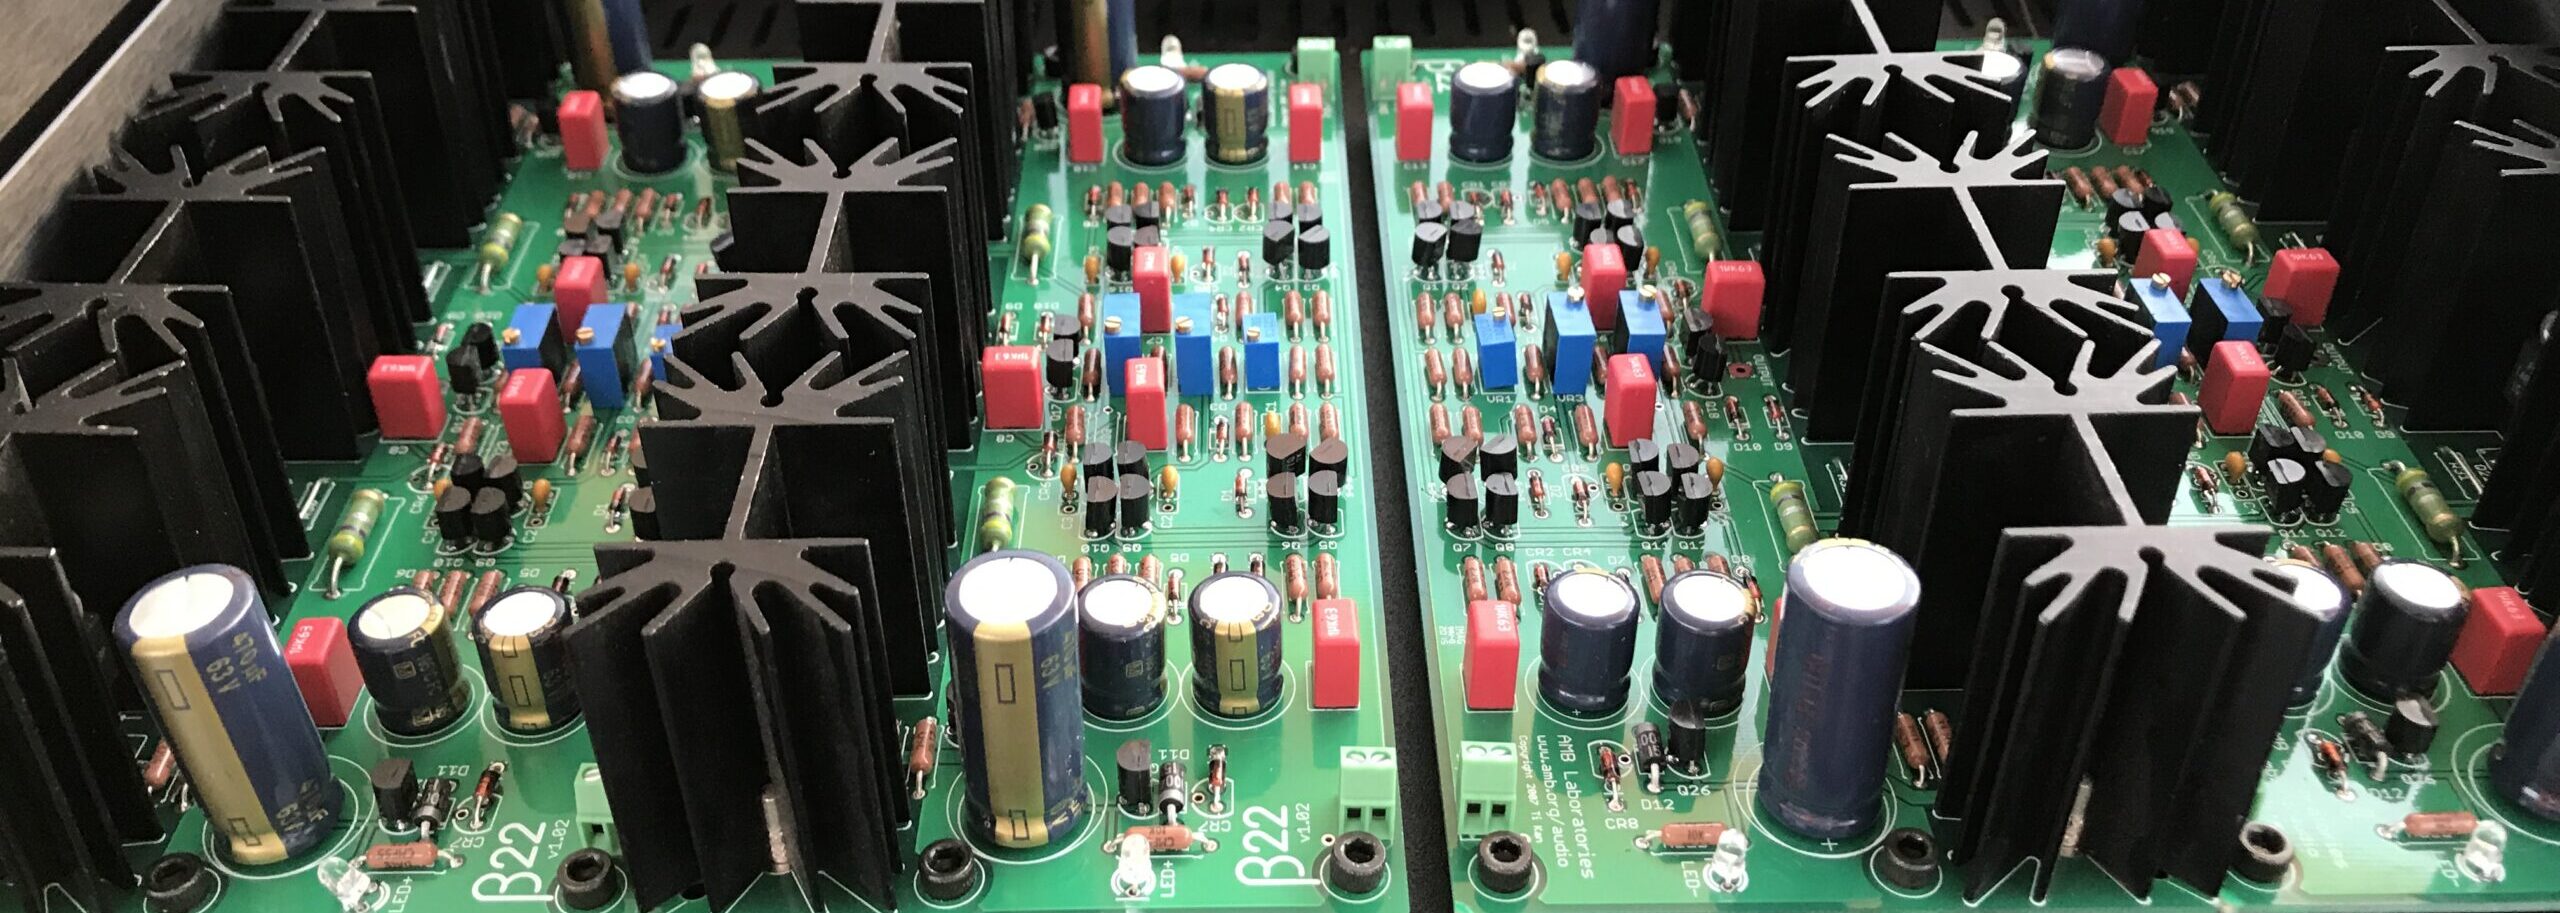
The Beta22 isn't your typical desktop amplifier. It's an all-discrete, heavy-duty Class A design. In plain English: it doesn't use off-the-shelf microchips or op-amps in the sound path. It uses raw, matched transistors pushing massive, clean power. I didn't just build a standard version, though. I went all-in on a fully balanced, 4-board configuration housed in a dual-chassis setup, designed to drive everything from my delicate headphones to passive room speakers.
Here is how it came together, the design choices I made, and what it looks like under the hood.
1.1 // THE POWER ARCHITECTURE: A TWIN ENGINE
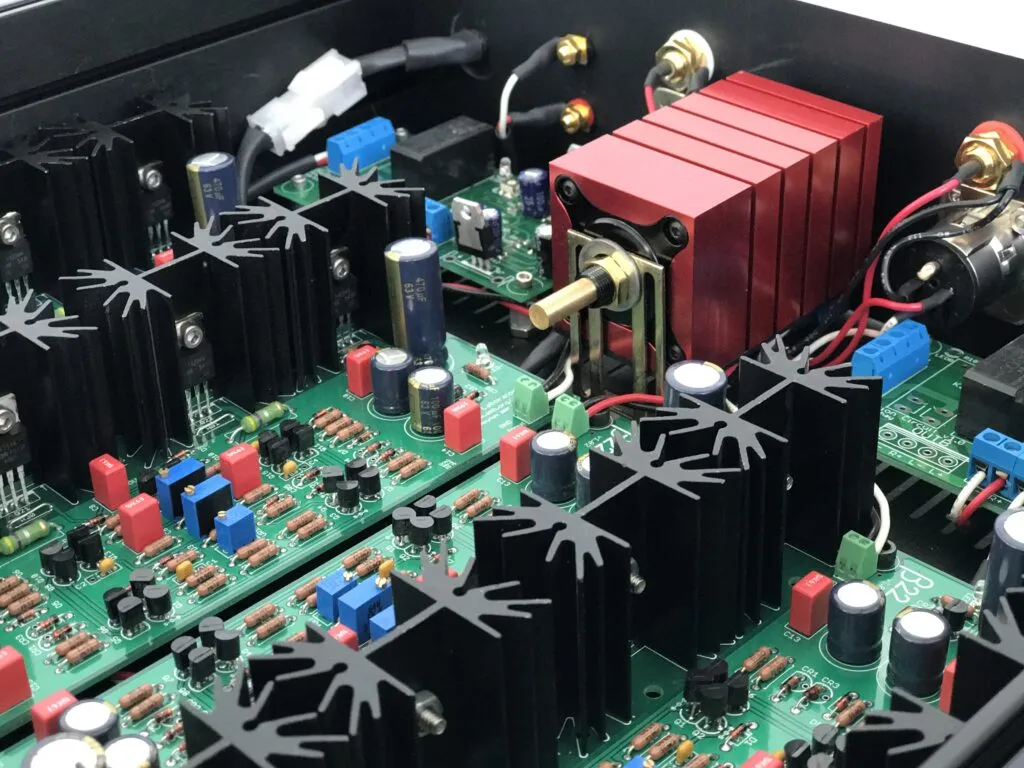
When you run four Class A amplifier boards, they pull a massive amount of continuous electrical current. They run hot, which is obvious the moment you look at the sea of black, star-shaped aluminum heatsinks crowding the main chassis. Because they demand absolute purity from their power source, I split the project into two entirely separate heavy enclosures.
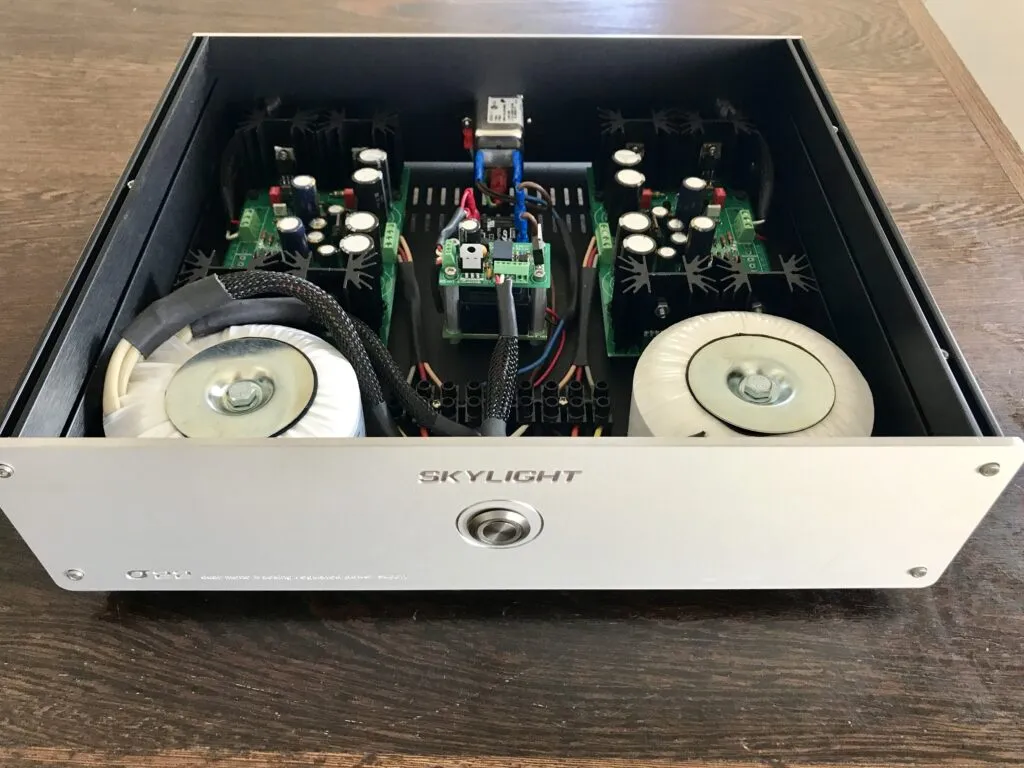
The standalone Power Supply Unit (PSU) is a masterclass in isolation. If the amplifier chassis is the heart of the system, this box is the twin-engine power plant feeding it.
Instead of dropping a single massive transformer inside and calling it a day, I went with a completely symmetrical layout:
Two Independent Toroidal Transformers: Tucked into the front corners, these white-shielded toroids separate the raw AC conversion early in the chain, minimizing any potential cross-channel interference.
Mains Filtering: Right at the power inlet, a shielded silver EMI/RFI filter cleans up line noise directly from the wall outlet before it can even reach the circuit.
The Electronic Soft-Start: Turning on multiple transformers at once creates a massive initial electrical gulp (inrush current) that can stress mechanical switches or trip room breakers. To solve this, I integrated a dedicated Crydom Solid State Relay (SSR) control circuit right in the center. It handles the heavy electrical lifting safely and smoothly.
Dual Sigma22 Regulator Boards: The filtered AC then feeds two independent, flawlessly assembled Sigma22 tracking regulator boards, ensuring the positive and negative power rails entering the main amplifier are completely stable and dead-silent.
An umbilical power cable links this box to the main mainframe, delivering ultra-regulated DC power to the main amp.
1.2 // INTERNAL WIRE MANAGEMENT

Looking inside high-end DIY gear often reveals a "nest" of messy wires. But when dealing with high-gain Class A circuits, sloppy layout introduces noise. To get a dead-silent noise floor, I followed three strict rules during the assembly of both enclosures:

The Right-Angle Separation: Keep AC lines and DC/Signal lines completely isolated. When they must cross paths, make sure they cross at a strict 90-degree angle to minimize electromagnetic coupling.

Tight Braiding and Sleeving: High-current AC lines running from the transformers were tightly twisted together to naturally cancel out stray magnetic fields, then bundled inside high-density braided sleeving.

Central Terminal Blocks:Instead of soldering wires directly to each other mid-air, I used heavy-duty barrier terminal strips in the PSU chassis. This keeps the distribution of power to the regulator boards perfectly symmetrical and makes any future servicing incredibly easy.
1.3 // ENTRANCES, EXITS AND LONG METAL RODE
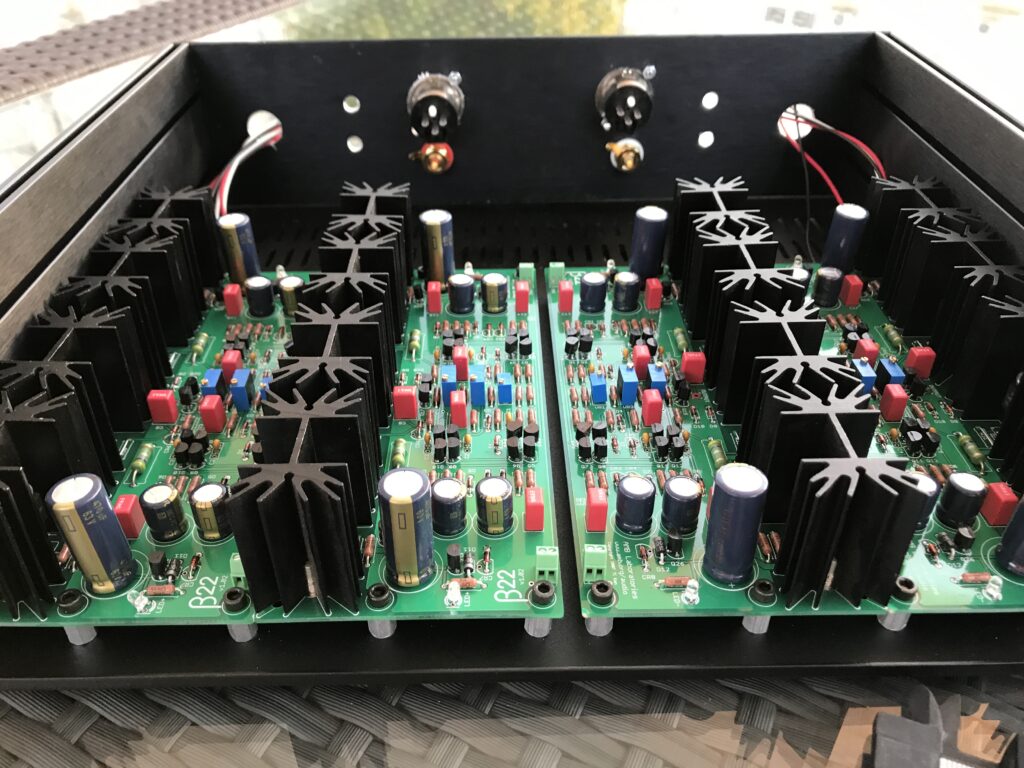
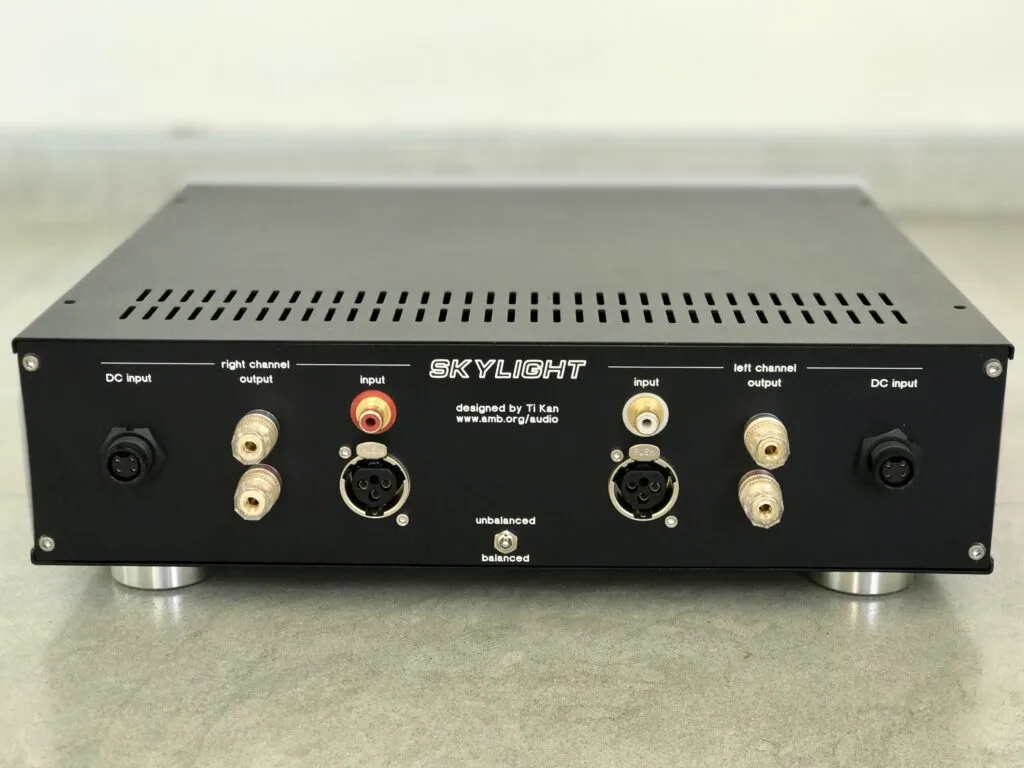
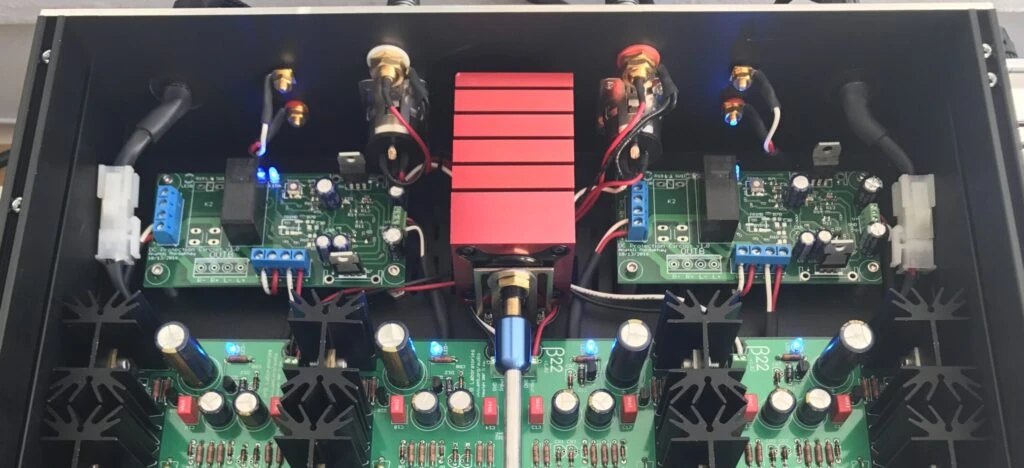
An amplifier of this caliber deserves to accommodate any source. I designed the back panel to handle both balanced (XLR) and unbalanced (RCA) inputs, making it the absolute centerpiece of my audio rack.
But managing the inputs and the volume control introduced a classic audio engineering puzzle.
If you put the volume knob on the front panel like a normal amp, you have to run long wires from the input jacks at the back, all the way to the front knob, and then back to the amplifier boards. Those long internal audio cables act like tiny antennas, picking up stray noise and ruining your signal purity.
My solution? I mounted the volume control switch directly to the back panel, right next to the input jacks. To control it from the front, I installed a long, solid metal extension shaft that runs straight down the center of the chassis to the front faceplate. The audio signals travel mere centimeters near the inputs, while your hand still gets the classic front-panel knob experience.
1.4 // THE 48-STEPS VOLUME SWITCH

For the volume control itself, I didn't want a standard potentiometer (the cheap volume dials that wear out and cause scratchy audio over time). Instead, I sourced a massive 48-step resistor array switch.

Instead of sliding a metal wiper across a track, turning this knob mechanically clicks between 48 distinct, ultra-precise pairs of military-grade resistors. The channels are always perfectly balanced, even at whispers. Best of all? The switch mechanism itself is housed in a gorgeous, striking vibrant red anodized enclosure that sits right at the dead center of the build. It gives the internal layout a serious, high-performance aesthetic edge.
1.5 // BUILT-IN PEACE: PROTECTION

If you decide to tackle a Beta22 build, you need to know that this circuit is as unforgiving as it is brilliant. The stock architecture does not have built-in short-circuit protection. During an earlier test stage of my DIY journey, I accidentally crossed an output line, which instantly burned out half a board before I could pull the plug.

Because of that experience, I wasn't taking any chances with my final build. Tucked neatly into the back corners of the main chassis, right next to the heavy-duty speaker binding posts, I integrated two dedicated DC Protection boards. Complete with their own blue status LEDs and safety relays, these boards constantly monitor the health of the circuit. If anything ever goes wrong, they instantly disconnect the outputs, acting as a bulletproof insurance policy for the system.
1.6 // EPILOG: THE NEXT PHASE

The ultimate reward of a 4-board balanced build is its sheer versatility. Because it doubles its voltage swing in balanced mode, it behaves less like a delicate headphone amp and more like a high-end compact power amplifier.

In my listening space, it flawlessly handles two completely different worlds:

The Delicate Detail: Connected via a balanced cable to my Grado GS2000e headphones, the background is completely, terrifyingly black. There is no hiss, no hum, just pure, effortless instrument separation and a massive, lifelike soundstage.

The Raw Power: With a flick of an output switch, it drives a pair of B&W (Bowers & Wilkins) bookshelf speakers. The amp controls the speaker cones with absolute authority, delivering punchy, tightly layered bass and crisp, uncolored midrange that easily fills the room.

It took countless hours of drilling aluminum, meticulous wiring, soldering many components, and precise bias calibration to get here. It's heavy, it runs warm, and it took a literal sacrifice of electronic components to master, but hearing your favorite tracks through a reference system you built with your own hands makes every single second worth it.