STATUS: COMPLETED
CATEGORY: SYNTHESIZERS
YEAR: 2013
THE MISSION: ORGANIC MUSIC
Building the Beast: My Journey to a Large Analog Synthesizer
How do you capture lightning in a bottle? Or, more accurately, how do you capture the living, breathing, organic sounds of the 1970s electronic music pioneers?
For years, I was fascinated by the massive modular setups used by legends like Tangerine Dream, Klaus Schulze, and Giorgio Moroder. Their melodies didn't just play; they moved, morphed, and breathed. By the mid-2000s, standard analog modulars were largely a thing of the past, but I caught the itch. Could I actually build one of these monolithic instruments myself?
The answer was yes.
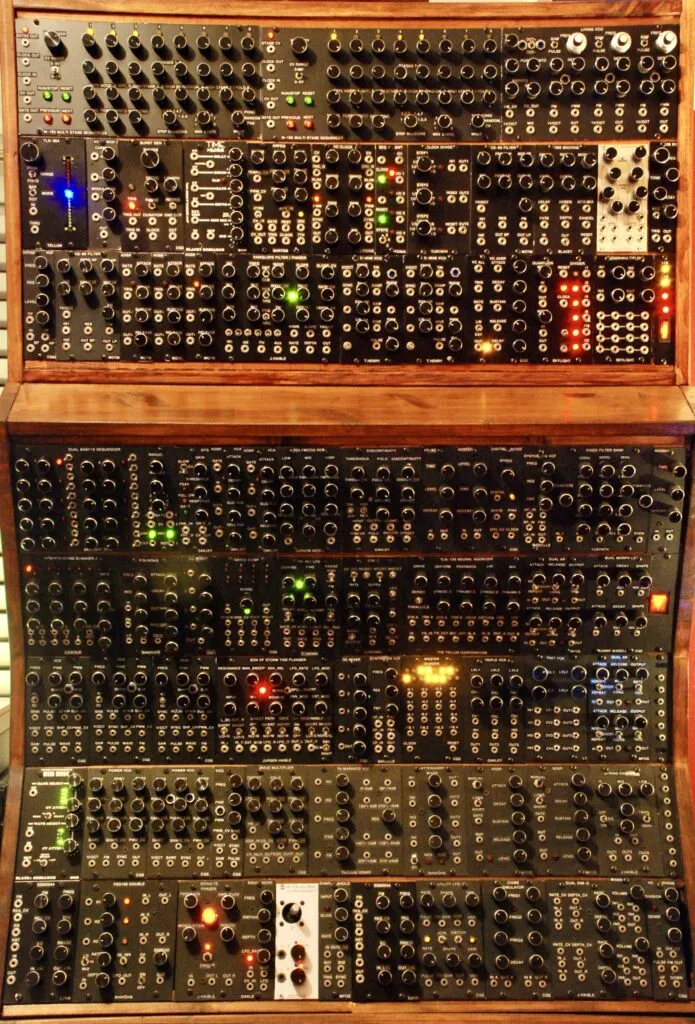
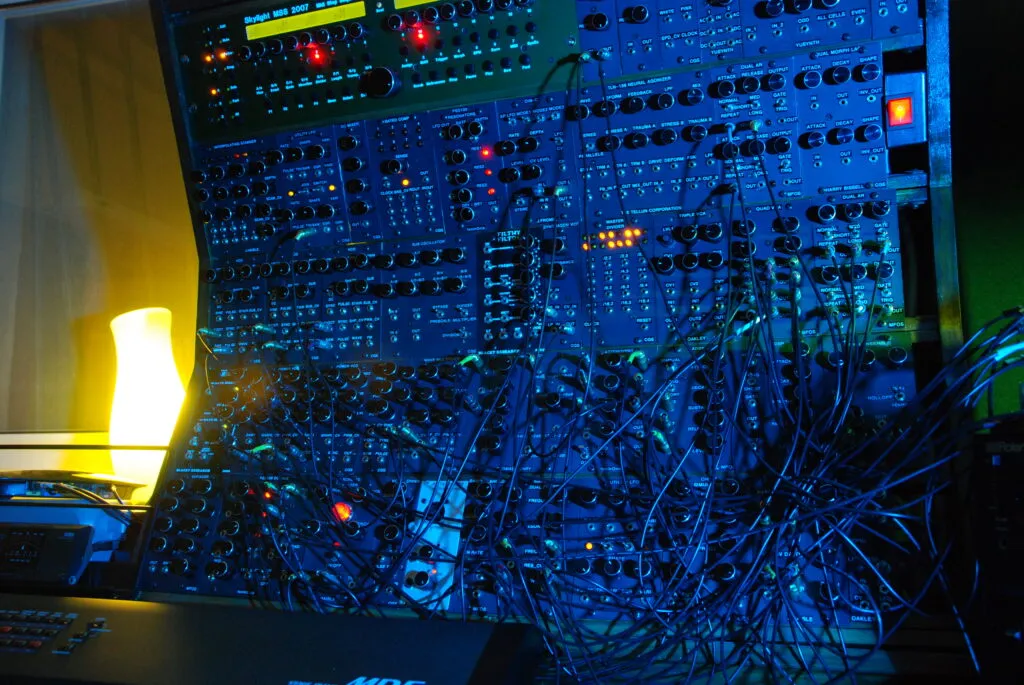
At its peak, my custom-built synthesizer spanned more than 90 individual modules. Here is the story of how it came to life.
1.1 // THE GATEWAY
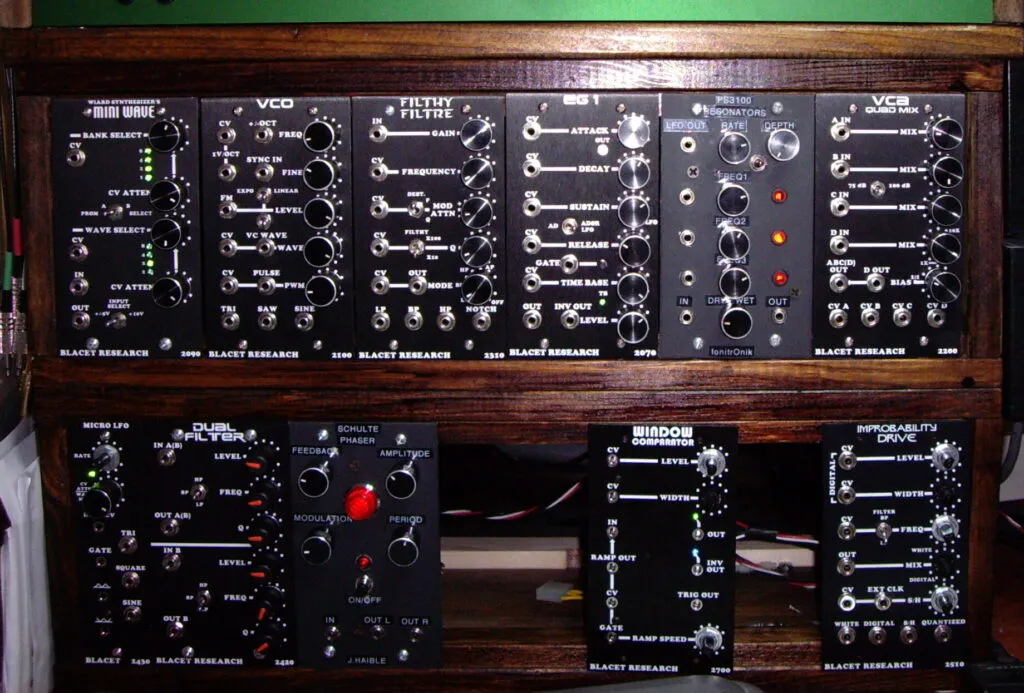
Every obsession has a starting point. For me, it was Blacet Research. They offered both complete and DIY modules for the core building blocks: Oscillators (VCOs), Filters (VCFs), Envelopes (EGs), VCAs, LFOs, and random voltage sources.
Blacet was the perfect gateway because the kits also included ready-made, professional front panels. Seeing that first core setup come to life, and even building a wavetable module to capture that classic digital-meets-analog PPG sound, gave me the confidence I needed to go bigger.
1.2 // GOING DEEP

Once I knew I could successfully solder a kit, I took the training wheels off. I started building from bare PCBs, sourcing every single resistor, capacitor, and IC myself.

Creating the front panels became an adventure in itself. I had large aluminum plates cut to single- and dual-width panels and spray-painted them a sleek matte black.

DIY Pro-Tip: The "Paper Drill" Technique
You don't need a CNC machine to make accurate panels. I used Front Panel Designer software to design my layouts, printed them at a 1:1 scale on standard paper, taped the paper directly to the aluminum, and used it as an exact drilling template. I then finished them off using a hobby label printer for the typography.
1.3 // ASSEMBLING THE BRAIN: CORE
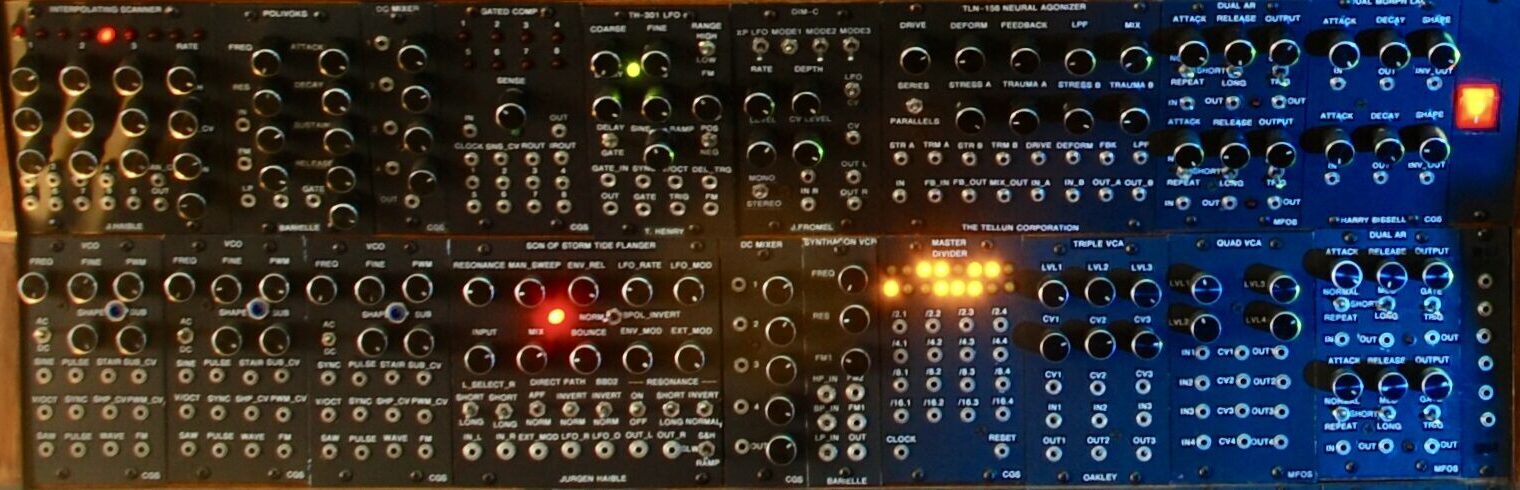
My modular became a melting pot of the best DIY synth designers in the community. I sourced PCBs from legendary names: CGS, MFOS, J. Haible, Oakley, MOTM, fonitrOnik, Yusynth, T. Henry, Hexinverter, and Barton.
Parts where ordered mainly from Mouser.com with some parts off eBay.
To save rack space, I started getting creative. I combined two CGS VCOs behind a single panel, dubbing it the "Power VCO," and used custom support boards to mix the incoming Control Voltage (CV) signals and the outgoing audio.
1.4 // THE SPICE: EFFECTS
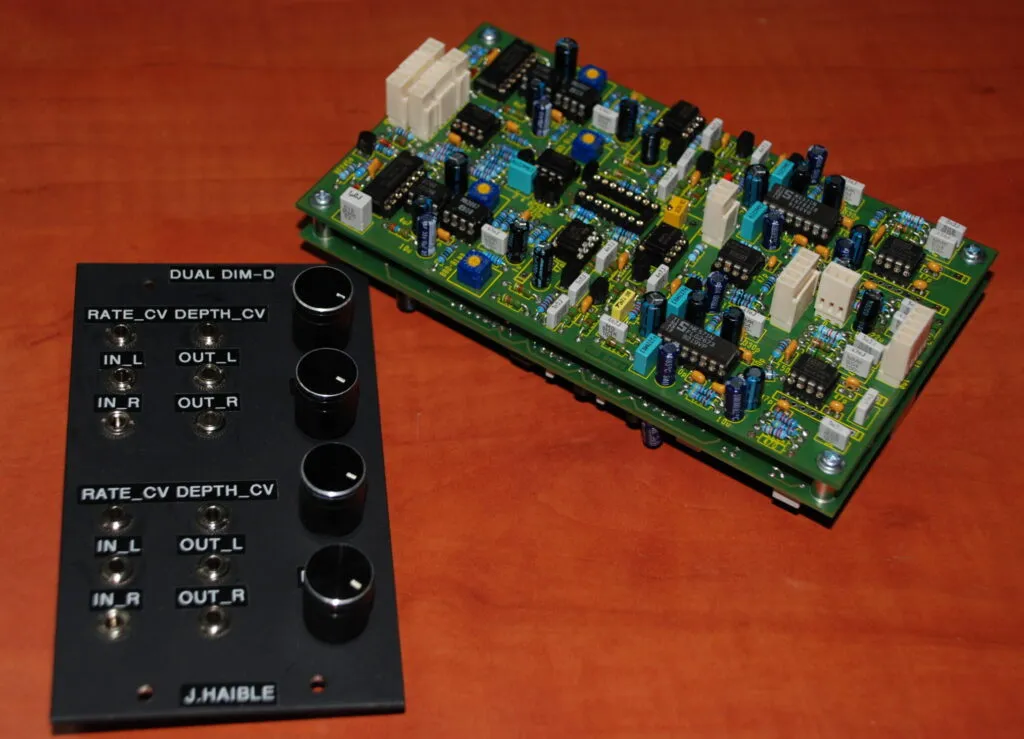
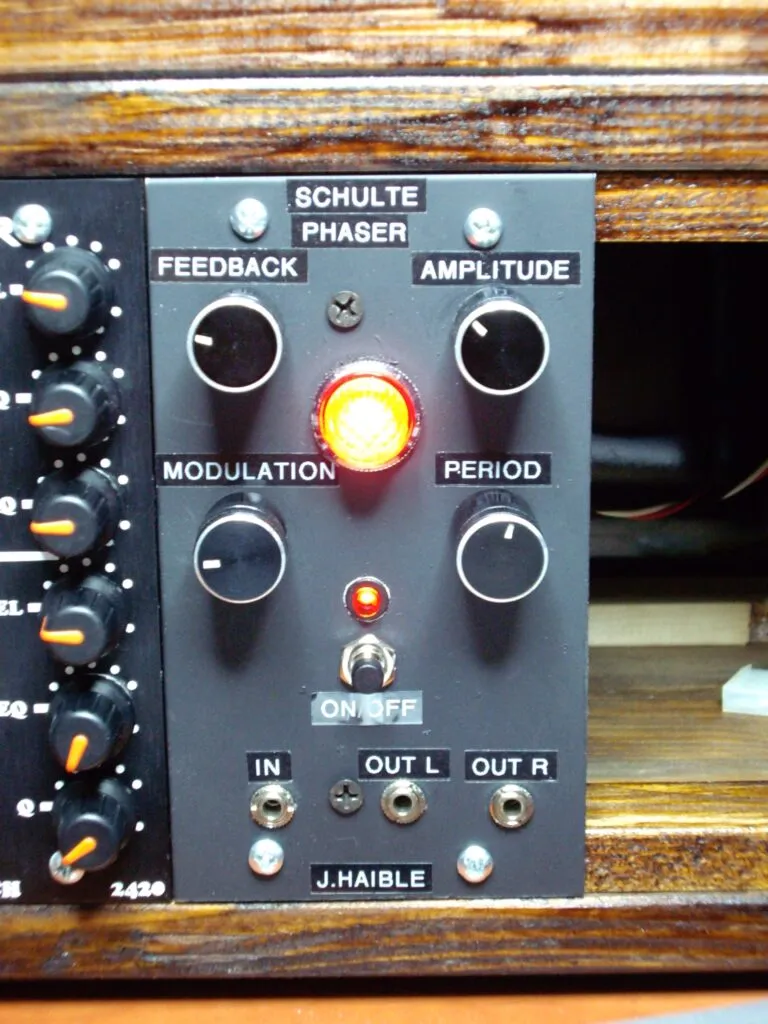
A dry synthesizer is great, but effects bring it to life. I built a massive rack of processing units: J. Haible's Dimension-D, Schulte Phaser, SOST Flanger, Varoslope Phaser, a Blacet Dual Time Machine, and a Tellun Neural Agonizer Stereo Spring Reverb.
But building effects is where I met my greatest nemesis.
The 243K Nightmare
The Schulte Phaser was the first effect I built, and it put me through absolute agony. When I finished soldering, it was completely dead. I spent months going back and forth, tearing my hair out trying to debug it. Finally, I decided to test and trace every single component value across the board as perhaps I got something wrong.
The culprit? Mouser.com had accidentally packed 243K Ohm resistors into a bag labeled 2.43K Ohm.
The Lesson: Always, always measure at least one component from every new bag with a multimeter before you solder it to the board!
To route all these effects, I built specialized mixers capable of handling both CV and audio, allowing for incredibly complex, rich, and intertwined signal paths.
1.5 // THE PULSE

My ultimate dream was the iconic Moog 960 sequencer with its cascading lights, but I built a powerhouse alternative. My sequencing brain consists of two Roland M-185 replicas, a breadboard-built Baby10, and the almighty Klee Sequencer. The Klee is pure magic, capable of surprising, non-linear sequences where flipping a single switch completely scrambles the notes and their order.

To emulate Tangerine Dream's famous "ratcheting" effect (rapid-fire note repetitions within a single step), I used a CGS burst generator. When triggered, it fires off a rapid burst of gates to my envelope generators. Combined with clock dividers, my sequences could feature rigid, beat-synced rhythms alongside relaxed, triplet-based movements.
1.6 // FEEDING THE BEAST

Because I started in the Frac-Rack form factor, everything runs on +/- 15V. A 90-module synth is incredibly power-hungry, requiring at least a massive 6 Amps for safe, stable operation.

DIY Pro-Tip: Load Balancing
You cannot run a system this size off a single wall wart. I installed multiple Power Supply Units (PSUs) inside each wooden enclosure, carefully distributing and load-balancing the modules across the power bus boards to prevent voltage sags or cross-talk.

This gives enough headroom to each PSU.
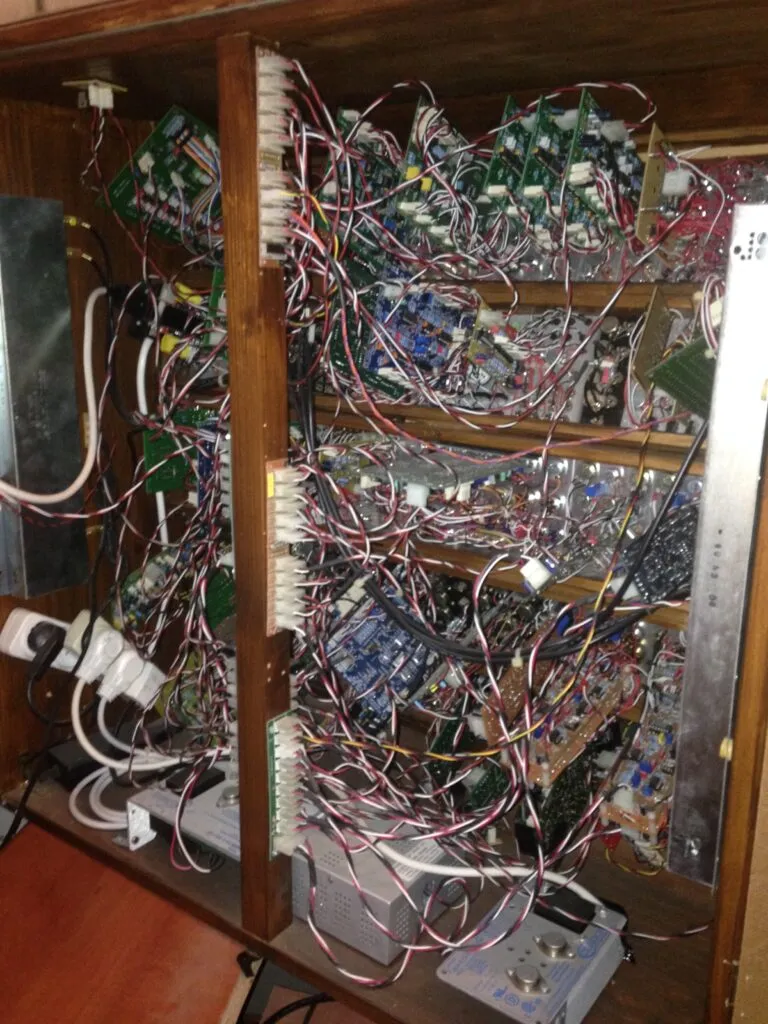
1.7 // THE SHELL

Classic analog modulars belong in wooden cases. I built custom, angled enclosures tailored to Frac-Rack dimensions to make patching ergonomic.

I opted for wooden rails for mounting the panels. You have to be incredibly careful when doing this, as there isn't much width for the mounting screws, but it gives a beautiful, organic feel to the instrument.

My favorite design choice? I built lightweight back panels on hinges. If a power rail failed or a module needed calibration, I could swing the back open for instant access without unpatching the front.
1.8 // BRIDGING WORLDS: SYNC
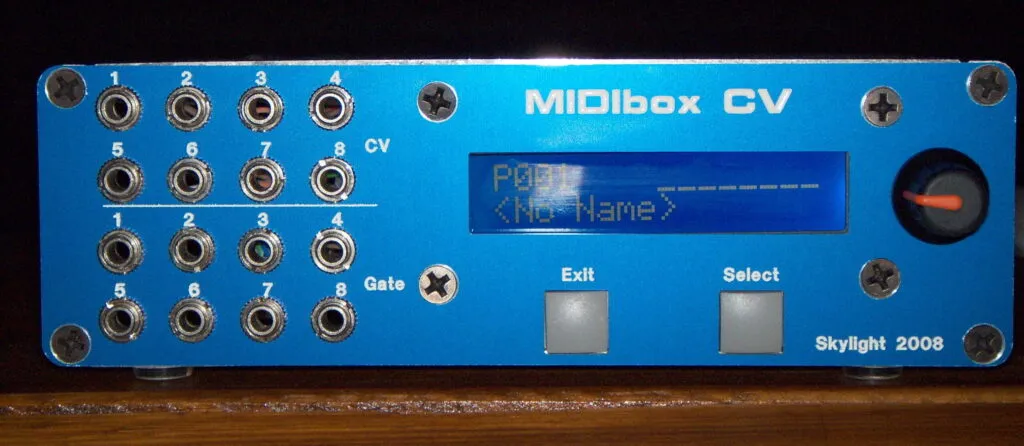
While the sound is purely analog, my recording process is modern. I used Atari Cubase, Avid Pro Tools, Apple Logic, and BitWig, meaning I needed a bridge between the digital and analog worlds.
I built a MidiBox CV unit featuring 8 channels of CV/Gate, plus a dedicated sync output to convert incoming MIDI clock into analog clock pulses.
This acts as the master heartbeat for the synth, locking all my analog sequencers, dividers, and LFOs tightly to the grid of my DAW for seamless recording and mixing.

2.0 // THE VERDICT

Since 2007, starting with my album Synergos, this massive modular setup has been the backbone of my music, providing endless sequencers and thick drone sounds.

Because it relies on pure analog circuitry, where voltages fluctuate with temperature and age, there is a constant sense of movement.

It shifts the music into realms of beautiful instability and emotion.

Playing it is a highly physical, musically gratifying experience.

Whether I am tweaking filter knobs, manually triggering ratchets, or pushing a flanger into a screaming overdrive, it genuinely feels like I am sculpting the music with my bare hands right as it happens.