STATUS: COMPLETED
CATEGORY: DRUM MACHINE
YEAR: 2020
THE MISSION: ROLAND TR-808
Building a Beat: The Sound of a Roland TR-808
There is a very specific kind of anxiety that comes with flipping the power switch on a machine you just spent months building. You've sourced rare, obsolete transistors from the dark corners of the internet. You've breathed in enough rosin fumes to last a lifetime, and you've agonized over hundreds of individual solder joints while soldering through hole parts.
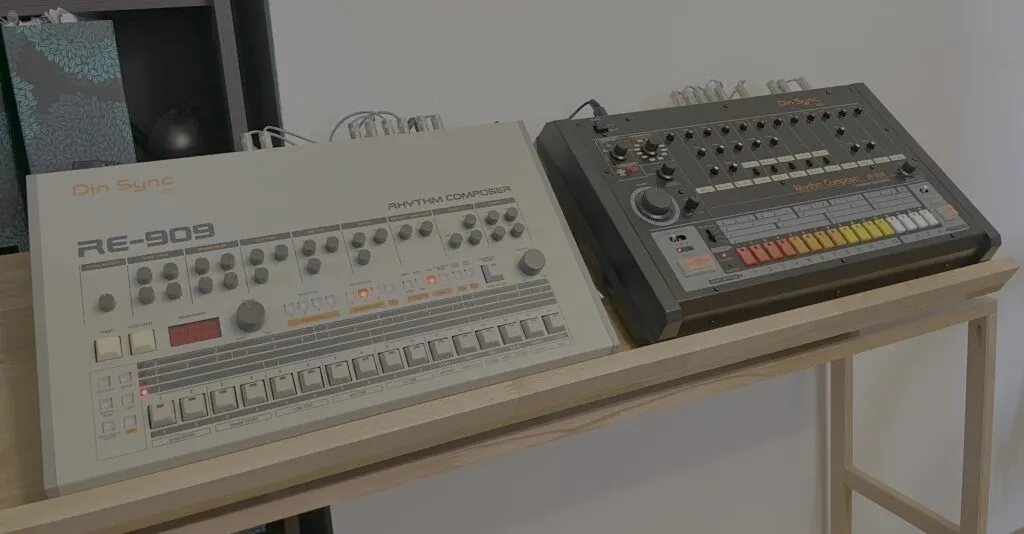
When I finally hit the "Start" button on my Din Sync RE-808, I held my breath. But then, the sequencer stepped forward, the cherry switches lit up, and that unmistakable, earth-shattering bass drum rattled my desk. This is the story of how I built an exact replica of the Roland TR-808, the most famous drum machine in the world, and what the journey taught me about patience, circuits, and the soul of electronic music.
1.1 // WHY ?

My obsession with this machine started when I listened to Tangerine Dream's Poland album and hearing the magical sounds emanating from its tracks.

I remember seeing an original Roland TR-808 on the second floor of a piano store mid '80 and instantly falling in love. I couldn't afford one when I started making music, and I can't afford an original one today, but I always wanted one.

So, I decided to finally build it.
1.2 // THE DIN SYNC PROJECT
The journey to resurrect this legend starts with the Din Sync project. Their website, re-303.com, offers kits and hardware parts for classical Roland machines. This was my first Din Sync project, but it quickly led to many others.
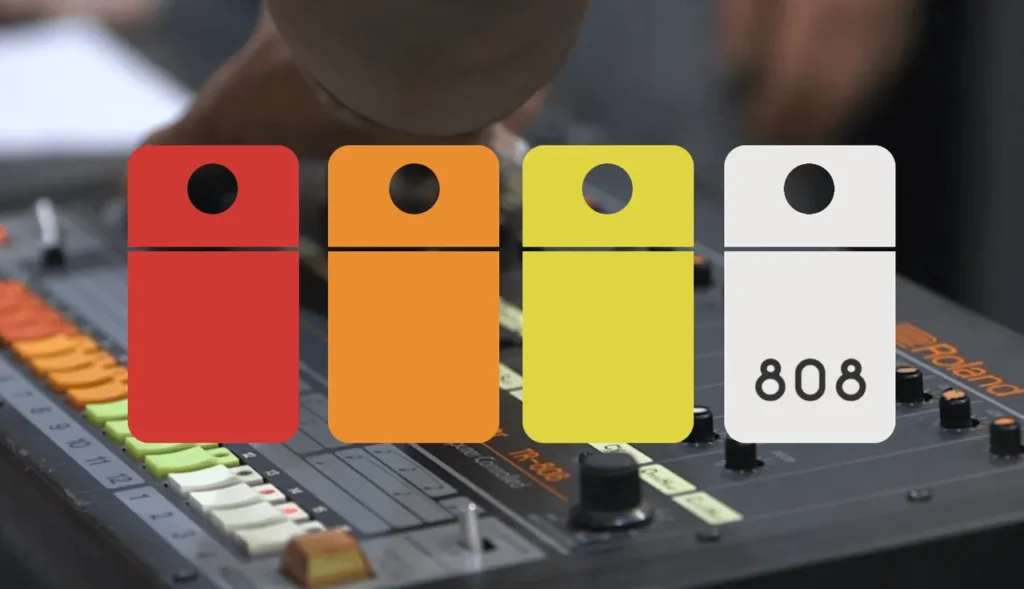
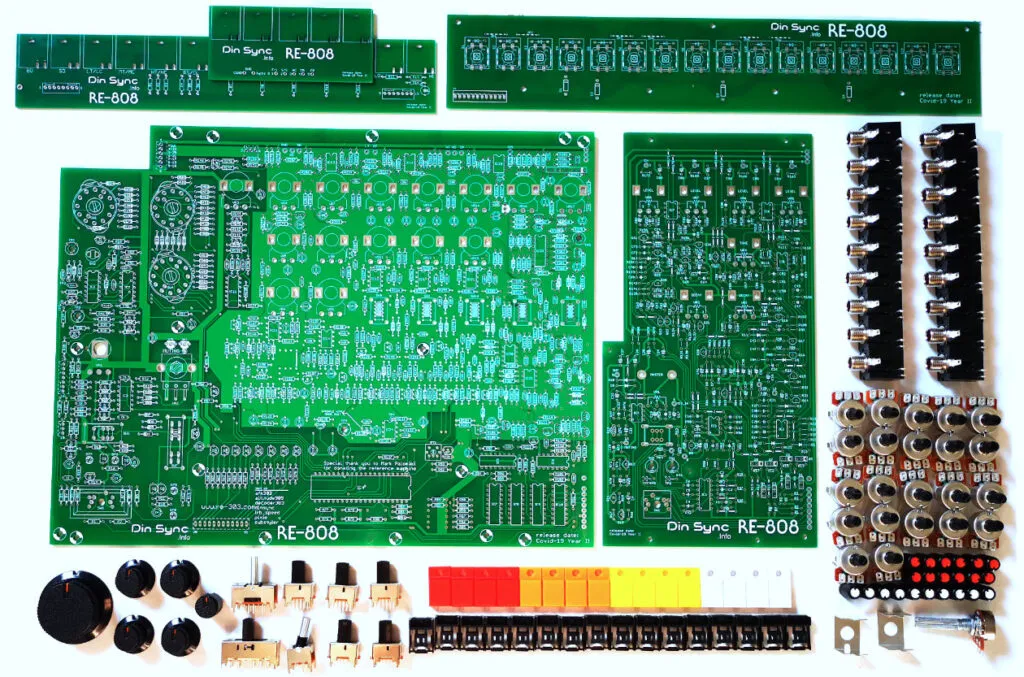
The provided kit contains the essential mechanical foundation: potentiometers, standard and toggle switches, the famous colored step caps, and the needed knobs.
1.3 // THE SOURCING SAGA
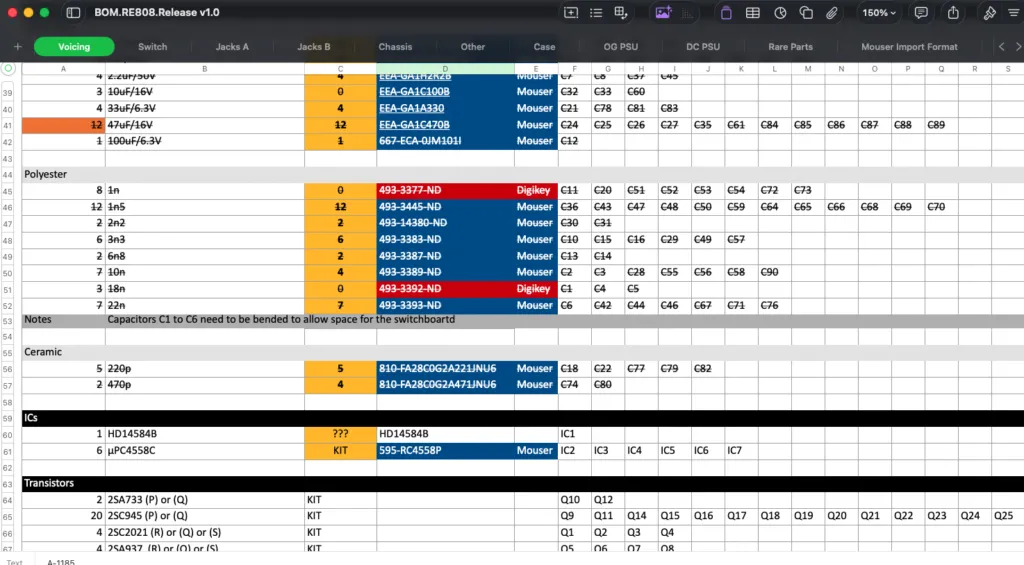
Before you can heat up your iron, you have to tackle the massive Bill of Materials (BOM). The hunt for regular, rare and obsolete parts is real. You will find yourself hunting down specific step switches, original op-amps, Sanyo Germanium diodes, and the correct 2SA733P and 2SC945P transistors. Thankfully, there are a few reliable sources for rare parts kits online, such as raresynthparts.com.
Pro Tip: Find a rigorous organization system early on. You will need a reliable way to keep track of the multiple parts sources and the build progress. I used an spreadsheet to track parts inventory, order phase and build progress.
1.4 // THE BUILD: BOARD BY BOARD
A very detailed step-by-step build instruction manual is provided at re-303.com, which greatly helps demystify the building process.
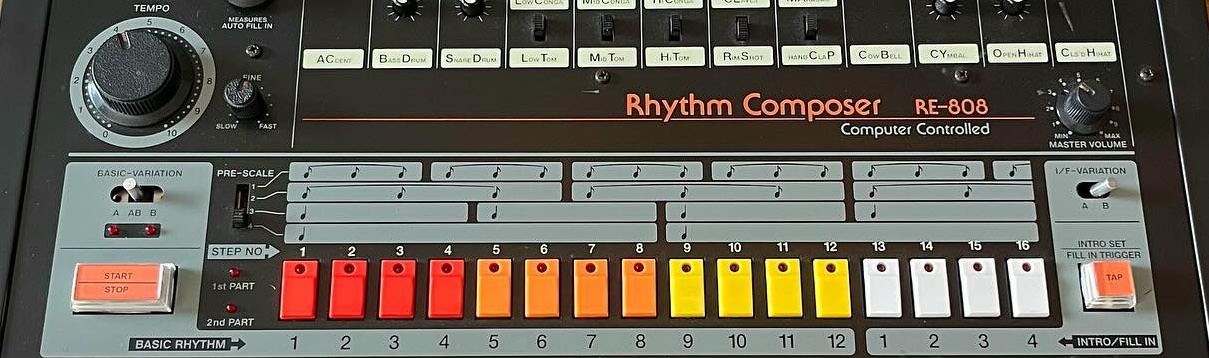
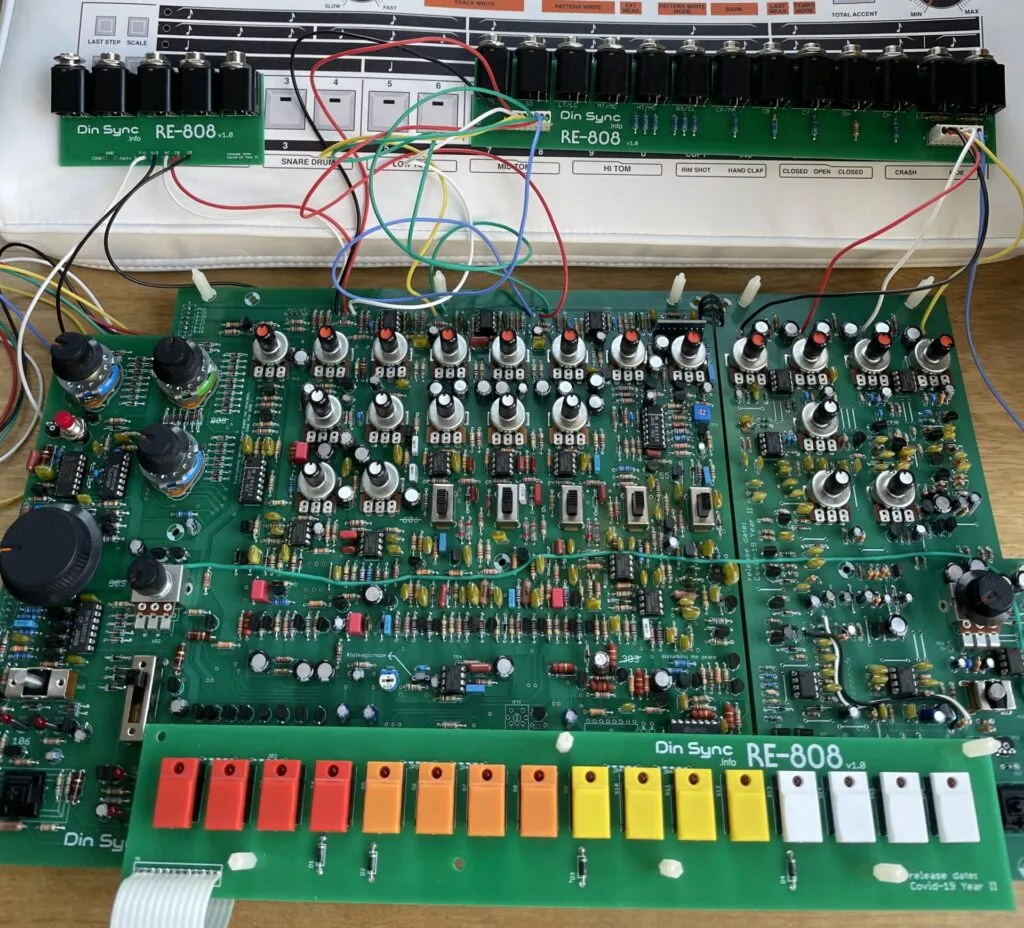
The Switch Board/Sequencer: This stage is all about repetition. There is a sheer amount of soldering required for the step keys and LEDs. Following the included instructions is crucial to get the key and LED perfectly aligned.
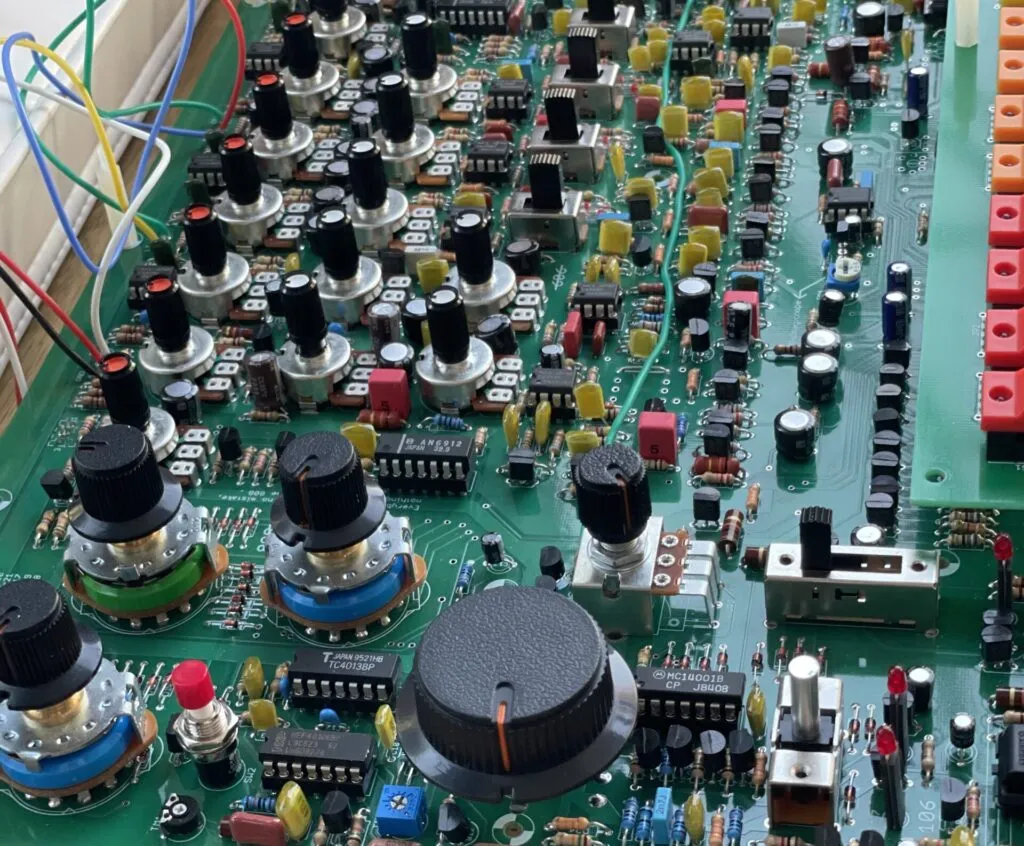
The Voicing Board: This is the heart of the machine. You will spend hours populating the different instrument blocks like the Kick, Snare, and Toms. Special care is required to create the legacy switches using modern Alps switches, which actually requires opening up switches from different types to assemble a completely new switch part.
The Power Supply: Remember a crucial DIY lesson: get the voltages right before plugging anything else in! The kit includes what is called a "safety board," which is a modern replica that delivers the same voltages as the original, but is more stable and robust.
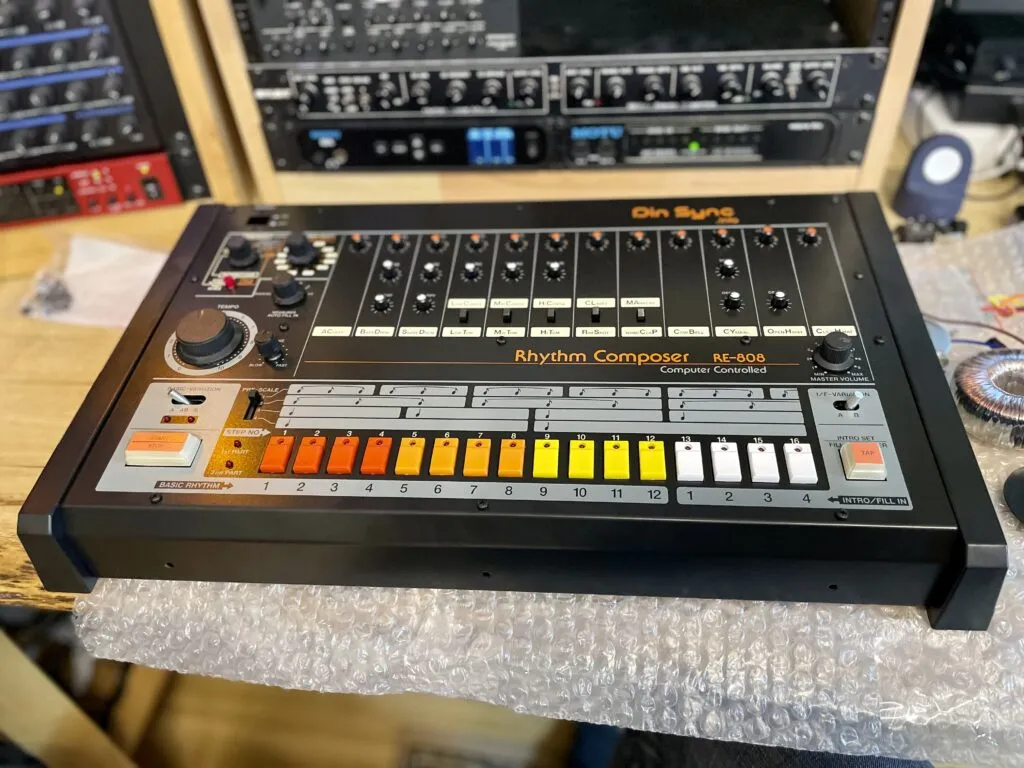
1.5 // HOUSING THE LEGEND: ENCLOSURE

After months of microscopic soldering, building the case is a fantastic, highly structural change of pace. Because the enclosures are a standalone production, you usually have to join a waiting list over at kumptronics.com.

It is absolutely worth the wait. The kit provides all the authentic mechanical hardware for a true replica: the classic side panels , the battery tray , rubber feet , and even the specific coin screw for the battery door. A very thorough, step-by-step case build guide takes the guesswork out of the final assembly.

You start by prepping the bottom panel , then mount the massive main circuit boards onto custom C-channel and Z-channel rails to keep them rigid. The delicate switch board gets perfectly elevated on a series of 8mm spacers. You even install a metal RF shield plate right over the circuitry for total historical accuracy.

Finally, marrying the completed boards to the top panel and screwing on those iconic side panels is the moment of truth. It is the exact second your project stops being a pile of exposed electronics and officially becomes a legendary drum machine.
1.6 // THE HEARTBREAK OF THE HAND CLAP

Every epic build hits a wall where you have to share your failures. Mine was the legendary 808 Hand Clap.

The build had been cruising. The sequencer stepped perfectly, and the kick drum was already rattling my windows. Confident, I engaged the step switch for the Hand Clap, ready for that iconic, trashy smack.

I pressed start. Click. Not a smack. Just a sad, anemic click. My stomach dropped.

The official Roland service manual literally warns that the CP (Hand Clap) sawtooth envelope generator has a "rather complicated operation". It relies on a specific AN6912 quad comparator and a densely packed thicket of components. I spent three hours in full panic mode, reflowing joints and checking for a backwards IC. Still just a click.

The next day, I busted out the multimeter and oscilloscope. Tracing the signal path backward, I found a flatline right where a 30ms pulse should have been triggering the envelope.
Out came the magnifying glass.

Finally, I spotted it. Hidden beneath a capacitor was a microscopic, hair-thin solder bridge shorting the envelope generator straight to ground.

One quick flick of the soldering iron later, I plugged the machine back in and hit start.
SMACK. Crisp, wide, and perfectly synthetic. It sliced through the mix like a knife. That wild swing from utter despair to total elation? That is the ultimate DIY high.
1.7 // TUNING THE BEAST

Once the machine passes audio, you have to calibrate it, which requires following the official Roland TR-808 service manual. This process gets incredibly technical. For example, setting the Cow Bell frequency involves connecting an oscilloscope and adjusting the internal trimmers to hit precisely 1.85ms/cycle and 1.25ms/cycle respectively.

But there is pure magic in tweaking those internal trimmers to get that perfectly tuned kick drum decay or the snappy snare. Simply tuning the cow bell brings the entire machine into focus.
2.0 // THE FINAL VERDICT

Building this machine intensifies the magic of analog instruments, teaching you an incredible amount about circuits and patience. To anyone on the fence, I highly encourage you to take the plunge and try DIY yourself.